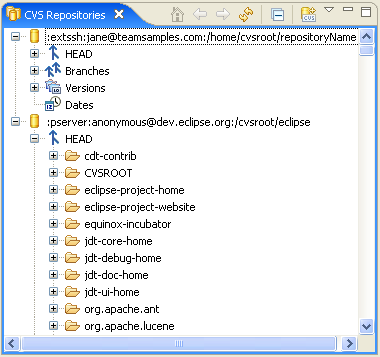
The CVS Repositories view, which is part of the CVS Repository Exploring perspective, shows the CVS repository locations that you have added to your Workbench. Expanding a location reveals the main trunk (HEAD), project versions and branches in that repository. You can further expand the project versions and branches to reveal the folders and files contained within them.
The pop-up menu for this view also allows you to specify new repository locations. Use the CVS Repositories view to check out resources from the repository to the Workbench, configure the branches and versions shown by the view, view resource history, and compare resource versions.
Here is what the CVS Repositories view looks like:

There are two types of folders displayed in the repositories view. For the most part, they can be treated in the same fashion. That is, they can be checked out from the Repositories view, etc. However, there are some cases where modules cannot be expanded in the Repositories view even though they can still be checked out.
 |
A CVS module that maps to a folder on the CVS server. |
 |
A CVS module defined in the CVSROOT/modules file of the repository. |
Like other views in the Workbench, the CVS Repositories view has its own toolbar. Toolbar buttons are provided for refreshing the view, navigating and creating new repository locations. The toolbar also contains a drop-down menu that allows you to filter the view by working set.
This command redraws the view, showing the repository locations as the roots displayed by the view.
This command redraws the view, showing the roots that where displayed immediately prior to the previous issued Go Into command.
This command redraws the view, making the children of the selected entry the roots displayed by the view.
This command refreshes the contents of the Repositories view.
This command collapses all expanded entries in the Repositories view.
This command brings up the wizard to help you specify a new repository location.
The drop down menu in the title bar allows the repositories view to be filtered by a working set. It also allows to hide CVS modules defined in the CVSROOT/modules file.
From the context menu of the Repositories view you can perform a number of interesting operations.
This command brings up the wizard to help you specify a new repository location (same as Add CVS Repository toolbar item).
This command, available on the repository location and Date category entries, brings up the dialog which allows the specification of a date tag that is to be added to the Date category of the location entry in the Repositories view.
This command checks the selected CVS modules out into projects in the Workbench with the same names as the remote modules (for remote modules that are folders on the server) or into projects with the name specified with the module (if the module is defined in the CVSROOT/modules file on the server).
This command open the Check Out wizard in order to allow the configuration of how the selected remote modules are checked out into the Workbench.
This command versions the selected resource based on the current branch contents.
This command versions the selected resource based on the current branch contents, moving the tag from previously tagged resources if required.
This command will compare two selected resources.
This command will compare the selected folder with a branch or version of the same folder.
This command will fetch all of the subfolders of the selected item in one pass.
This command will refresh the repository folder tree.
Creates a new repository location based on the content of the clipboard. There must a valid repository location string (eg. :pserver:dev.eclipse.org:/cvsroot/eclipse) in the clipboard in order paste a new connection.
Copies the identification string of the selected repository to the clipboard.
This command will remove the selected repository location. Note that all projects that were previously mapped to this repository must first be unmapped.
This command brings up the wizard to help you discover the branch and version tags that exist in the repository for the selected folder so they can be added to the repositories view to allow the resources that have these tags can be browsed.
This command, available on repository location entries, allows you to refresh the list of known branches and versions that are displayed in the repositories view for selected projects. This operation makes use of the defined auto-refresh files for each project. If the operation fails for a particular project, use Configure Branches and Versions on the project to select one or more appropriate refresh files.
This command adds the selected project to the list of projects that are displayed under the specified branch in the repositories view. This command only modifies the repositories view and does not affect the repository in any way. If you want to add the project to a branch, you can perform a Tag with Existing after performing this operation.
This command opens the selected file in an editor. Since file revisions in the repository are immutable, the editor opens in a read-only state, so it is not modifiable.
This command shows the contents of file with annotations identifying the author of each line of code in the file.
This command shows the revision history of the selected file in the History view.
Available on repository location entries, this command allows the modification of any of the properties of the location. It also allows the assignment of a display name and a server encoding which is used to translate file paths and commit comments between the client and server (but does not affect file contents).

Team programming with CVS
CVS Repositories
Branches
Versions
Local history

Creating a CVS repository location
Discarding a CVS repository location
Refreshing the CVS repositories view
Changing the properties of a CVS Repository Location
Checking out a project from a CVS repository
Replacing resources in the Workbench
Sharing a new project using CVS
Viewing a file's revision history